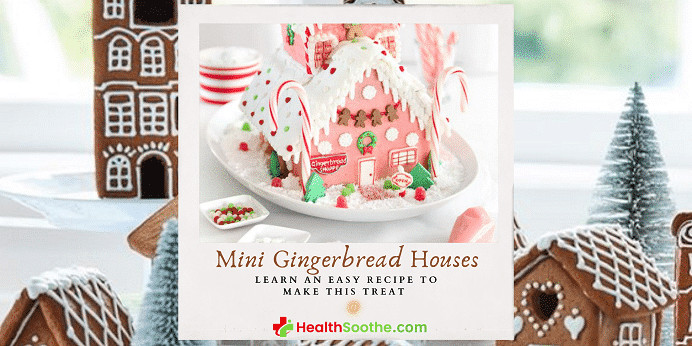
If you’re looking for the sturdiest but also very delicious mini gingerbread houses, the recipe provided in this article will get you there. A high quantity of shortening is the secret to a strong house that will last for weeks (or more).
Quick Facts About Mini Gingerbread House
If you like to nibble on your gingerbread house, use unsalted butter in place of shortening for a tastier and more cookie-like flavor. Whichever you choose, be sure to bake the cookies until they’re very crisp; doing so will reduce the moisture in the dough, which is important for the house’s stability.
This recipe for mini gingerbread houses will produce more dough than you need for one large house or three small houses. Re-roll the scraps and make an extra small house, or create decorative elements like a door, window ledges, shutters, a chimney, or gingerbread people to snack on while you decorate.
All right, let’s start making as many strong and delicious mini gingerbread houses as we like!
- Mini Gingerbread Houses – What are they? How Do They Taste & Look Like?
- Making Mini Gingerbread Houses or Mini Gingerbread Cookies
- Can You Freeze Gingerbread Cookies?
- Recipe Notes - Some Baking Strategies to Keep in Mind To Guarantee You Create That Wonderful Batch Of Mini Gingerbread Houses Every Time
- A DIY Holiday Cookie Idea That Everyone Will Love!
Mini Gingerbread Houses – What are they? How Do They Taste & Look Like?
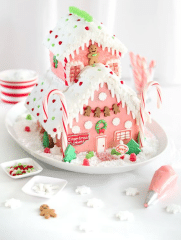
Holiday cookies don't get any cuter than these mini gingerbread houses that kids and adults alike will love. Use mini gingerbread houses or a cookie cutter to cut out all the parts (the kids will love helping with this part), then build the houses and let the kids go to town decorating.
Line up your finished creations to make a gingerbread house village, eat them up, or prop them up on mugs of cocoa for dipping and munching.
Are the holidays approaching? If they are, it signifies that baking season is here!
Get out your mixing bowls, whisks, and spoons! Creating little gingerbread cookies and homes has become a standard Christmas tradition in numerous families, including mine.
There's something magical about mini gingerbread houses baking in the oven. The spicy scent of cinnamon, ginger, and cloves welcomes you and comforts you. It's also a visually appealing approach to getting the children involved with family rituals.
So get out the frosting and sprinkles and prepare to host a mini gingerbread house decorating party this holiday season! These mini gingerbread houses are the ideal addition to any gingerbread festivities!
The Nutritional Information of Mini Gingerbread Houses per serving (4 mini gingerbread houses)
- Calories: 403 kcal
- Protein: 5g
- Carbohydrates: 73g
- Dietary fiber: 1g
- Sugars: 41g
- Fat: 12g
- Saturated fat: 7g
- Cholesterol: 2.8mg
- Vitamin A: 15.45U
- Folate 5.9mcg
- Calcium 4.53mg
- Iron: 0.23mg
- Magnesium 6.65mg
- Potassium: 35.03mg
- Sodium: 19.1mg
- Thiamin: 0.03mg
- Added sugar: 17g
Making Mini Gingerbread Houses or Mini Gingerbread Cookies
- Prep Time: 45mins
- Chill Time: 2hrs
- Cook Time: 40mins
- Total Time: 3hrs, 25 mins
- Yield: 4 mini gingerbread houses
Equipment & Kitchen Utensils Used: Food processor, kitchen table, baking tray, parchment paper, timer, pans, mixing bowls, sharp knife, oven, freezer, wire rack, cake plate, or serving board.
Ingredients
- 1kg of plain flour, plus a little extra for dusting
- 300g of cold butter (diced)
- 2 tablespoons of mixed spice
- 2 tablespoons of ground ginger
- 1 tablespoon of bicarbonate of soda
- 450g of light soft brown sugar
- 3 large eggs
- 225g of golden syrup
- 300g of royal icing sugar
- Few ping-pong-size balls of regal icing (wrapped in cling film)
The Best Recipe for Making Perfect Gingerbread Houses
There is much to consider when looking for the best gingerbread cookie recipe to use as the basis for your small gingerbread homes. You would like the cookies to be soft yet robust enough to be used to build roofs and walls. You desire the dish to be spicy, somewhat chewy, and molasses-rich.
All of these are the reasons I encourage this recipe for mini gingerbread houses in this article.
Also, use royal icing to produce the ideal 'glue' to keep your buildings together. Just be careful to put it on the thicker side to ensure that there is sufficient stick to hold the pieces.
Cutting the Cookies
You may purchase a particular cookie cutter to cut the cookies after baking them and then creating the required shape you want. It takes a little more time to cut out the sides of the homes by hand, but it's a terrific alternative to using a cookie cutter. 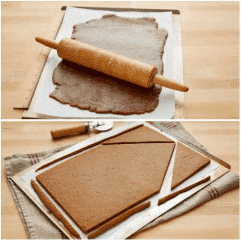 You also do not have to await shipment! You can create them right now! If you're going to make a lot of them, a cookie cutter will come in handy.
Constructing the Gingerbread Houses
When the cookies have fully cooled down and the royal icing has been produced, you may begin constructing!
I believe that having a moveable surface to construct on (such as a cookie sheet or plate) is beneficial so that when it comes to placing your homes away to dry, you do not have to physically touch them too much because it can make them fall apart. Begin with the front of the home and add a line of icing to each side.
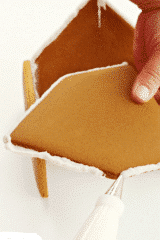 Next, while still holding it, place it on top of the surface standing erect. One at a time, attach the side parts.
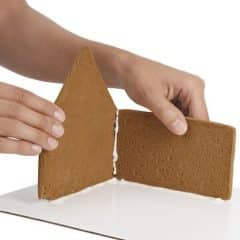
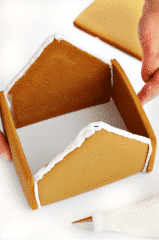
The gingerbread houses should be able to stand on their own at this stage, but you should still create the rear of the house rapidly. To join the rear piece, add some icing to the edges of the sides. It will be totally stabilized after that is installed.
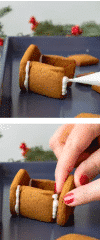 Squeeze it gently to establish a strong attachment.
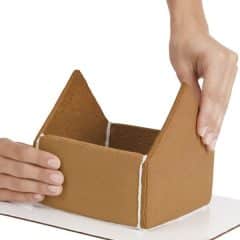 Finally, attach the roof components.
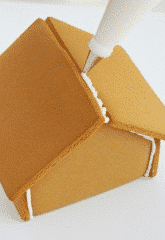
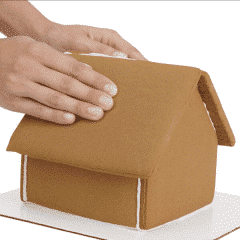 After the roof is in place, apply additional icing to the central seam for added grip.
Decorating the Mini Gingerbread Houses
After you've successfully made your mini gingerbread houses, it's time to decorate them!
Everything goes when it comes to decorating gingerbread houses. Encourage the youngsters to be imaginative as they decorate the mini gingerbread houses with various sweets and unique shapes!
Decorate with gumdrops, Necco's candies, M&M's, sprinkles, sugar canes, Jordan almonds, and candy buttons, - the possibilities are unlimited. Colored sweets in various forms will significantly affect the dwellings and offer a lot of depth.
 A piece of advice is to use small candies whenever feasible. Since the dwellings are little, mini candies are more appropriate. You may also make use of powdered sugar to simulate snow on the gingerbread house roof or sprinkles to coat the whole rooftop area.
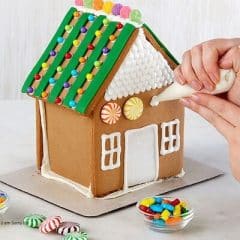
Just pipe icing around the whole rooftop before placing the sprinkles over the top to ensure they stay in place.
Have fun with the enchantment of Christmas with what you're able to build with friends and family, whether you're constructing mini gingerbread houses or mini gingerbread villages.

Just set each gingerbread house atop cups filled with hot chocolate and serve. It's worthy of being eaten!

 To add a personal touch, to give it a more festive appearance, I prefer to dip the mug's sides into melted chocolate and then in little dried marshmallows.
You're set for a pleasant night with the help of a candy cane stirrer!

The Directions
STEP 1
Place half of the dough (flour) in a food processor also with butter & whizz until no lumps of butter remain. Combine the remaining flour, spices, and bicarb with a pinch of salt.
In your largest mixing basin, combine both floury mixes and toss in the sugar. (If you do not have a food processor, massage the butter into the flour till it looks like fine crumbs.
Next add the spices, bicarb soda, and sugar. Mix the eggs and golden syrup, then incorporate them into the flour mixture using a wooden spoon. Knead the ingredients into a smooth dough using your hands.
STEP 2
Preheat the oven to 200°C/180°C fan/gas. Roll out a quarter of the dough at a time on a piece of parchment paper to the thickness of two £1 coins. Cut around-the-house templates with a tiny, sharp knife - remember that you'll need 2xA, 2xB, and 2xC for each home.
Remove the trimmings and place the gingerbread on baking pans, paper side up. Reroll the trimmings to cut out all of the shapes you need.
STEP 3
Bake the gingerbread one pan at a time for 8-10 minutes on a high rack of the oven, until it is a wonderful, deep brown, and firm to the touch. After each tray has been cooked, gently place the templates back onto the appropriate forms and trim any edges to neaten them.
Stamp off any windows with a cutter or cut away any doors using a tiny, sharp knife. Let all of the biscuits cool fully.
STEP 4
In a mixing bowl, sift the royal icing sugar and add water dribbles to make a firm frosting. Put some into a food bag (cover the remainder), cut the smallest corner, and pipe whatever frosting decorations you wish onto the gingerbread. Let it dry.
STEP 5
Place the wall biscuits in the order they will be assembled, then pipe icing along the side edges and attach the walls together. Pipe additional icing where the walls meet on the interior of the home, then use your icing balls to support the sides. Let it set for a few hours.
STEP 6
After drying, adhere to the roofs as described above - you may need to hold the biscuits firmly in place for a few minutes until the icing begins to set - or shape your icing balls to support the roof's borders. Leave aside overnight, and then use any leftover royal icing to help you decorate your homes with candy and sprinkles.
Can You Freeze Gingerbread Cookies?
You can refrigerate undecorated, cooked cookies from whatever gingerbread recipe you used for up to a month, therefore feel free to prepare them ahead of time and build the homes with icing afterward.
Just thaw for just an hour or more and you're set to start piping frosting! If you are unwilling to make them all at once, you may freeze half of the dough. Before freezing, place it inside a plastic zip-lock bag. Let the dough defrost in the fridge overnight before baking the cookies.
Recipe Notes - Some Baking Strategies to Keep in Mind To Guarantee You Create That Wonderful Batch Of Mini Gingerbread Houses Every Time
A high quantity of shortening is the secret to a strong house that will last for weeks (or more).
If you like to nibble on your gingerbread house, use unsalted butter in place of shortening for a tastier and more cookie-like flavor. Whichever you choose, be sure to bake the cookies until they’re very crisp; doing so will reduce the moisture in the dough, which is important for the house’s stability.
This recipe for mini gingerbread houses will produce more dough than you need for one large house or three small houses. Re-roll the scraps and make an extra small house, or create decorative elements like a door, window ledges, shutters, a chimney, or gingerbread people to snack on while you decorate.
Be careful to work on a well-floured surface so that the dough for the gingerbread houses doesn't adhere to your tabletop or the rolling pin.
The dough for the gingerbread house should not be overworked. Try not to reroll too often (2x max). It's crucial advice. If you overmix the gingerbread house dough or stretch it out too thinly, it loses its softness and you won't get the desired hard and crisp edges having a soft interior. Of course, if you are just going to use them for decoration, you may roll them out a couple more times.
Gingerbread performs best when cooked at a consistent temperature of 350°F, which is the best spot for this popular holiday dessert. This is due to the fact that molasses and brown sugar are more fragile than refined white sugar and may burn more quickly and readily in the oven.
Before you begin decorating your homes with a combination of candies and frosting, ensure they have fully cooled. Nothing ruins the appearance of a gingerbread home like melting frosting! After the homes have cooled down on a cooling or wire rack, you may start icing and decorating!
A DIY Holiday Cookie Idea That Everyone Will Love!
The nicest thing about this mini gingerbread house recipe is that the gingerbread houses are designed to fit on the rim of a cup!
People prefer to use them as beautiful cup toppers for cocoa to soak and chew on, but you can also wrap them and give them to friends and family in colorful mugs.
Or, you may construct a slew of homes and display them as a little gingerbread town! Whatever you do with your gingerbread home, both children and adults will enjoy this charming and inventive Christmas treat!
I Am odudu abasi a top-notch and experienced freelance writer, virtual assistant, graphics designer and a computer techie who is adept in content writing, copywriting, article writing, academic writing, journal writing, blog posts, seminar presentations, SEO contents, proofreading, plagiarism/AI checking, editing webpage contents/write-ups and WordPress management.
My work mantra is: “I can, and I will”
Mini Gingerbread Houses | Learn the Best Recipe for Making Beautiful, Delicious & Sturdy Mini Gingerbread Houses

If you’re looking for the sturdiest but also very delicious mini gingerbread houses, the recipe provided in this article will get you there. A high quantity of shortening is the secret to a strong house that will last for weeks (or more).
Type: Dessert
Cuisine: American
Keywords: Mini Gingerbread Houses
Recipe Yield: 4 mini gingerbread houses
Calories: 403kcal
Preparation Time:
45M
Cooling Time: 2H
Cooking Time: 40M
Total Time: 3H25M
Recipe Ingredients:
- 1kg of plain flour, plus a little extra for dusting
- 300g of cold butter (diced)
- 2 tablespoons of mixed spice
- 2 tablespoons of ground ginger
- 1 tablespoon of bicarbonate of soda
- 450g of light soft brown sugar
- 3 large eggs
- 225g of golden syrup
- 300g of royal icing sugar
- Few ping-pong-size balls of regal icing (wrapped in cling film)
Recipe Instructions:
Step 1:
Place half of the dough (flour) in a food processor also with butter & whizz until no lumps of butter remain. Combine the remaining flour, spices, and bicarb with a pinch of salt.
Step 2:
Step 3:
Step 4:
Step 5:
Step 6:
After drying, adhere the roofs as described above – you may need to hold the biscuits firmly in place for a few minutes until the icing begins to set – or shape your icing balls to support the roof’s borders. Leave aside overnight, and then use any leftover royal icing to help you decorate your homes with candy and sprinkles.
87
The content is intended to augment, not replace, information provided by your clinician. It is not intended nor implied to be a substitute for professional medical advice. Reading this information does not create or replace a doctor-patient relationship or consultation. If required, please contact your doctor or other health care provider to assist you to interpret any of this information, or in applying the information to your individual needs.

