Today, in this article, you are gonna learn how to make lemon bars. I love this lemon dessert recipe so much that I am very thrilled to share it with you, and it will make an epic addition to your cooking book.
Quick Facts About Lemon Bars
These are the best lemon bars and I don’t use that statement lightly. After one taste, I’m confident you’ll agree. Everyone needs this recipe.
The process is pretty simple and I’m walking you through each step using a very easy step-by-step recipe for making lemon bars. All right! Pick up some fresh citrus and let’s get baking. Spring is in the air!
Lemon Bars – What Are They & What Do They Taste Like?
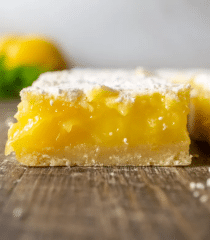
These are classic lemon bars featuring a soft butter shortbread crust and a tangy sweet lemon curd filling that’s baked to the perfect consistency. The lemon layer is thick and substantial, not thin or flimsy like most other lemon bar recipes.
Lemon bars can be prepared in only 2 bowls and a baking pan, and the clean-up is a breeze. These lemon bars win 1st place every time because they’re the perfect balance of tangy and sweet. In fact, they are usually the first dessert to disappear in any event despite other competitive desserts like chewy brownies, cupcakes & animal cracker cookies.
Nutritional Information of a Lemon Bar – One Serving
- Calories: 385kcal
- Carbohydrates: 66g
- Protein: 6g
- Fat: 12g
- Saturated Fat: 7g
- Cholesterol: 111mg
- Sodium: 113mg
- Potassium: 79mg
- Fiber: 1g
- Sugar: 46g
- Vitamin A: 407IU
- Vitamin C: 8mg
- Calcium: 22mg
- Iron: 2mg
Lemon Bars Recipe
- Prep Time: 10 minutes
- Cook Time: 40 minutes
- Inactive Time: 3 hours
- Total Time: 3 hours, 50 minutes
- Yield: 24 lemon bars
Equipment & Kitchen Utensils Used: 9x13-inch glass pan, glass mixing bowls, spatula or wooden spoon, teaspoons, food processor, sifter, tablespoons, silicone whisk, parchment paper, measuring cup or kitchen scale, sharp knife, timer, oven, refrigerator, baking sheet, juicer, powdered sugar shaker, fine mesh sieve, cake plate, or serving board.
Ingredients
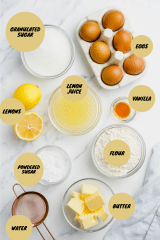
- Butter: Melted butter is the base of the shortbread crust. Always ask for unsalted butter. simply because different producers utilize varied quantities of salt in salted butter. The simplest method to get consistent results from this recipe is by employing unsalted butter and then adding as much salt as needed individually. If you don't have unsalted butter, use salted butter instead! Just leave out the excess salt.
- Sugar: Sugar sweetens the crust and lemon curd filling layers. Not only this, it works with the eggs to set up the lemon filling. If reduced, the filling will be too wet.
- Flour: Flour is also used in both layers. Like sugar, it gives structure to the lemon filling. These days, I add slightly more flour to the shortbread crust compared to my cookbook version. You can get away with 2 cups, but an extra 2 Tablespoons really helps solidify the foundation of the lemon bars.
- Vanilla Extract: I use 2 teaspoons of vanilla extract in the shortbread crust. Not many lemon bar recipes call for vanilla extract and I promise you it’s many bakers’ best-kept secret.
- Salt: Without salt, the crust would be too sweet.
- Eggs: Eggs are most of the structure. Without them, you have lemon soup!
- Lemons: Fresh, real lemons, not juice from a bottle. I've had inquiries about substituting different citrus fruits, which is perfectly great. Try substituting zest and orange juice.
- Lemon Juice: I highly recommend using lemon juice squeezed from fresh lemons. You can also use another citrus like blood orange, grapefruit, or lime juice.1https://www.allrecipes.com/recipe/10294/the-best-lemon-bars/
Making Lemon Bars Just in 5 Steps
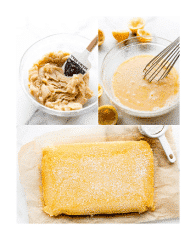
- Prepare the crust: Mix all of the shortbread crust ingredients, then press firmly into a 9×13-inch baking pan. Interested in a smaller batch? See my recipe note.
- Pre-bake: Pre-baking the crust guarantees it will hold up under the lemon layer.
- Prepare the filling: Whisk all of the filling ingredients together. No cooking on the stove!
- Bake: Pour the filling on the warm pre-baked crust, then bake for around 20 minutes or until the center is just about set. I slightly increased the baking temperature from my cookbook version. Either temperature works, but 325°F is preferred.
- Cool: I usually cool the lemon bars for about 1 hour at room temperature, then stick the whole pan in the refrigerator for 1-2 more hours until relatively chilled. They’re wonderfully cold and with a dusting of confectioners’ sugar on top!
Instructions
- Set the oven to 350F and line a 9×13-inch baking dish with parchment paper. Sift the flour, salt, and powdered sugar into a bowl and whisk together.
- Pour in the melted butter. You can also make the shortbread crust in a stand mixer fitted with a paddle attachment, there’s less elbow grease needed and the paddle tends to break the dough into smaller pieces that are easier to spread in the pan. You may want to add an optional teaspoon of vanilla if you love it in everything.
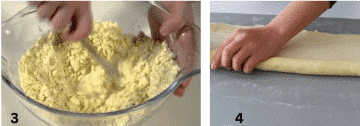
 3. Mix in the batter using a spatula or wooden spoon. If you're doing this by hand, crumble the dough between the fingers after mixing.
4. Put the dough onto the prepared baking sheet and push it down with your fingertips. Make a uniform layer with a coverage that is complete on the bottom. There is no need for a thick layer, just a foundation is needed for the lemon filling. Bake for 20 minutes at 350°F, or until you see a light golden color. Some bakers like to add an additional 5mins for a crisp golden base, but this is all up to personal preference.
 5. In a food processor, combine the sugar and the zest of 3 lemons. Blend till the zest is completely absorbed.
6. When finished, the sugar is going to have a lovely light golden hue and will be fairly aromatic. If you don't have a food processor, try mincing the lemon zest and combining it with the sugar in a plastic bag. Lemon-infused sugar is incredible!
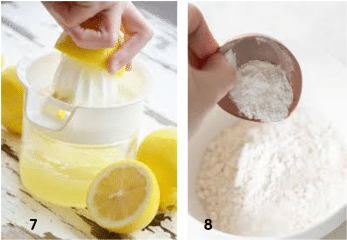
 7. Juice the lemons till you've got a cup (240mL) I will admit that I generally add a little more lemon, so if you'd like to add a few more tablespoons-1/4 cup, go ahead.
8. In a large mixing basin, combine the lemon sugar and the remaining half cup of flour. If you're worried about lumps, sift the sugar and flour together, but be sure to pour out any zesty sugar pieces.
 9. To evenly distribute the flour, whisk the mixture vigorously.
10. Add the lemon juice & eggs, then whisk vigorously to ensure that the sugar and flour are well combined with the lemon & eggs.2https://preppykitchen.com/lemon-bars/

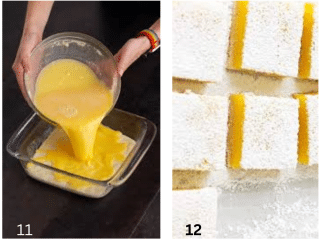
11. Pour in the heated short-crust base on top of the filling. I put the pan on a bigger baking sheet to make it simpler to set inside the oven & remove. Bake at 350°F for approximately 25 minutes, or until the middle is just set. Halfway through baking, rotate the pan.
12. Let the bars chill for at least one hour before transferring them to the refrigerator for another two hours to chill. Remove from the pan and remove the parchment paper once cold. Some bakers usually sprinkle it with sugar for visual contrast, but it's not required. To cut the bars, use a sharp wet knife. For the cleanest cuts, clean and re-wet the knife after making each cut.
Recipe Notes - Guaranteed Tricks to Make the Best Lemon Bars
- Use a glass pan: Ceramic is fine, but glass is best. Do not use metal. I always detect a slightly metallic flavor in the lemon bars when baked in metal pans.
- Use fresh juice: Store-bought bottles are convenient, but you miss out on a lot of flavors. You will definitely taste the difference! I have a super old citrus juicer, but I recently purchased this juicer for my mom and she loves it. Highly recommended.
- Special Tools (affiliate links): 9×13-Inch glass pan, glass mixing bowls, spatula, silicone whisk, juicer, and fine mesh sieve
- Halve the Recipe: Halve each of the ingredients to yield around 12 squares in a 9×9-inch baking pan. Same oven temperature. Bake the crust for 16-18 minutes and the bars for 20 minutes or until the center no longer jiggles.
- Sifting: More often than not, the flour doesn’t fully incorporate into the lemon filling unless it’s sifted with sugar. As directed in the recipe, sift the two together before adding the eggs and lemon juice. I don’t always do this (and didn’t even do it in the video above!) but it’s preferred to avoid any flour lumps. If you have a sifter, it’s worth using. If you forget, it’s not a huge deal. Here is my favorite sifter. You use it again to dust the lemon bars with confectioners’ sugar.
- Lemon Juice: For exceptional taste, I highly recommend fresh lemon juice. Since lemons are the main component, you don't want to use the concentrate or bottle versions. Or use another fresh-squeezed citrus like grapefruit, blood orange, lime, or regular orange. You can slightly reduce the sugar if using a sweeter citrus. I recommend no less than 1 cup of granulated sugar in the filling as it’s needed for structure.
- Room Temperature: Bringing the eggs and lemon juice to room temperature helps them mix easier into the flour and sugar. However, I never notice a taste or texture difference when using cold. Room temperature or cold, use whichever!
- Parchment Paper: Line a baking dish with parchment paper. The parchment paper used makes it extremely simple to remove it from the pan, but you can also use foil in a hurry.3https://sallysbakingaddiction.com/lemon-bars-recipe/
- After Baking: Don't be concerned if your lemon bars seem undercooked when you remove them from the oven. When they cool, they will keep setting.
- Pre-preparation, Post-preparation - Storage: Lemon bars can be prepared ahead of time. Cut and freeze on an already spread baking sheet. Wrap each one separately and freeze for up to 3 months. Before serving, thaw and sprinkle with powdered sugar.
- Cooling: Don't hurry the cool time; you'll need it to set up the bars.
Did you notice air bubbles, perhaps even a white layer of air bubbles, on top of your baked lemon bars? That’s completely normal. It’s the air from the eggs rising to the surface. Some batches have it, some don’t. Regardless, the lemon bars taste the same and a dusting of confectioners’ sugar covers it right up!
Making Lemon Bars Is So Easyyy-Peasyy
You only need 7 ingredients to make these lemon bars. The lemon curd filling is extra thick and creamy and sits on an irresistible butter shortbread crust. Always bake lemon bars at a lower temperature to avoid over-baking. They’re simply the best lemon bars and are perfect for picnics, bake sales, spring brunches, baby showers, and bridal showers.
Lemon bars can be prepared in only 2 bowls and a baking pan, and the clean-up is a breeze. These lemon bars win 1st place every time because they’re the perfect balance of tangy and sweet. In fact, they are usually the first dessert to disappear in any event despite other competitive desserts like chewy brownies, cupcakes & animal cracker cookies.
Frequently Asked Questions About Lemon Bars
How do you cut them cleanly?
Use a sharp knife. Dampen before cutting and make sure to clean the blade off after each cut. Use one downward motion to cut through. If the top seems a bit sticky or tough, you can pre-score the top with a very sharp knife or razor blade before cutting.
Do I need to refrigerate them?
If you’re leaving lemon bars out for more than a few hours they should be refrigerated. Luckily they’re delicious served chilled or at room temperature.
How do I know if they are set?
You’ll know your lemon bars are done when the center doesn’t really jiggle and the edge is set. As the bars cool the filling in the middle will set. Follow the prescribed baking time but if the bars seem runny you can give them a few more minutes.
Additional resources and citations
- 1https://www.allrecipes.com/recipe/10294/the-best-lemon-bars/
- 2
- 3https://sallysbakingaddiction.com/lemon-bars-recipe/
Lemon Bars | A Step-By-Step Recipe on How to Make the Best-of-the-Best Lemon Bars (with a Video Tutorial, Enlightening Pics & Straight-on FAQs)
These are classic lemon bars featuring a soft butter shortbread crust and a tangy sweet lemon curd filling that’s baked to the perfect consistency. The lemon layer is thick and substantial, not thin or flimsy like most other lemon bar recipes.
Type: Dessert
Cuisine: American
Keywords: Lemon Bars
Recipe Yield: 24 lemon bars
Calories: 385kcal
Preparation Time: 10M
Cooking Time:
40M
Inactive Time: 3H
Total Time: 3H50M
Recipe Ingredients:
- Shortbread Crust:
- 1 cup (230g; 2 sticks) of unsalted butter, melted
- ½ cup (100g) of granulated sugar
- 2 teaspoons of pure vanilla extract
- ½ teaspoon of salt
- 2 cups + 2 Tablespoons (265g) all-purpose flour (spooned & leveled)Lemon Filling:
- 2 cups (400g) granulated sugar
- 6 Tablespoons (46g) of all-purpose flour
- 6 large eggs
- 1 cup (240ml) of lemon juice (about 4 lemons)
- Confectioners’ sugar for dusting (optional)
Recipe Instructions:
Step 1:
Step 2:
Pour in the melted butter. You can also make the shortbread crust in a stand mixer fitted with a paddle attachment, there’s less elbow grease needed and the paddle tends to break the dough into smaller pieces that are easier to spread in the pan. You may want to add an optional teaspoon of vanilla if you love it in everything.
Step 3:
Step 4:
Put the dough onto the prepared baking sheet and push it down with your fingertips. Make a uniform layer with a coverage that is complete on the bottom. There is no need for a thick layer, just a foundation is needed for the lemon filling. Bake for 20 minutes at 350°F, or until you see a light golden color. Some bakers like to add an additional 5mins for a crisp golden base, but this is all up to personal preference.
Step 5:
Step 6:
Step 7:
Step 8:
Step 10:
Step 11:
Step 12:
Let the bars chill for at least one hour before transferring them to the refrigerator for another two hours to chill. Remove from the pan and remove the parchment paper once cold. Some bakers usually sprinkle it with sugar for visual contrast, but it’s not required. To cut the bars, use a sharp wet knife. For the cleanest cuts, clean and re-wet the knife after making each cut.
83

