Indulge in the perfect marriage of two beloved treats with Oreo Brownies. These delectable desserts bring together the rich and fudgy goodness of brownies with the iconic and irresistible flavor of Oreos.
With every bite, you’ll experience a symphony of textures, from the moist and chocolatey base to the delightful crunch of Oreo cookie chunks scattered throughout.
Whether you’re a chocolate lover, a dessert enthusiast, or simply looking to satisfy your sweet tooth, Oreo Brownies are sure to captivate your taste buds and leave you craving more.
In this article, we’ll dive into the world of Oreo Brownies, exploring their origins, sharing mouthwatering recipes, and offering tips to create the perfect batch in your own kitchen.
Get ready to embark on a chocolatey adventure as we uncover the magic of Oreo Brownies and show you how to elevate your baking game with this irresistible treat.
Oreo Brownies – About Them

Get ready to embark on a delectable journey into the world of Oreo Brownies. These irresistible treats are a true testament to the marriage of two iconic desserts: the classic chocolate brownie and the beloved Oreo cookie.
Indulge your senses as we unravel the magic behind these mouthwatering delights. Oreo Brownies brings together the best of both worlds – the fudgy richness of a chocolate brownie and the delightful crunch of Oreo cookies.
This divine fusion elevates the traditional brownie to new heights, creating a treat that is simply irresistible. With each bite, you’ll experience a harmonious blend of velvety chocolate and the unmistakable Oreo essence, leaving you craving more[mfn]https://www.mondelezinternational.com/Our-Brands/Oreo[/mfn].
| Nutritional Information of Oreos and Oreo Cookies Per Serving |
| Nutrition | Values for Oreos Yield: 24 cookies | Values for Oreo Cookies Servings: 45 |
| Calories | 283kcal | 95kcal |
| Carbohydrates | 37g | – |
| Protein | 3g | – |
| Fat | 14g | 5g |
| Saturated fat | 8g | 3g |
| Polyunsaturated fat | 1g | – |
| Monounsaturated fat | 4g | – |
| Trans fat | 1g | – |
| Cholesterol | 36mg | 14mg |
| Sodium | 165mg | 28mg |
| Potassium | 104mg | 6mg |
| Fiber | 1g | 0g |
| Sugar | 21g | 8g |
| Vitamin a | 263iu | – |
| Vitamin C | – | 0mg |
| Calcium | 20mg | 2mg |
| Iron | 2mg | 0mg |
The Recipe for Oreo Cookies
- Prep Time: 10 minutes
- Cook Time: 14-16 minutes
- Cooling Time: 15 minutes
- Total Time: 39-41 minutes
- Yield: 24 cookies
Equipments & Kitchen Utensils Used: Measuring cups, Ziploc bag, teaspoon, oven, large and medium-sized mixing bowls, timer, spatula, baking sheet, silicone baking mat or parchment paper, and an air-tight container.
Ingredients
- Brown sugar: Adds sweetness and taste, as well as keeping the cookies chewy and moist.
- Salt: It complements the other tastes.
- Vanilla extract: Gives flavor.
- Oreos: The cookie’s main attraction!
- Granulated sugar: It adds sweetness, taste, and promotes browning.
- Butter: Adds taste and tenderness (to the texture).
- All-purpose flour: Flour is required to provide structure to the cookies.
- Baking soda: It aids in the leavening and lifting of the dough.
- Eggs: By giving structure, it binds the cookies together.
- Semi-sweet chocolate chips
This Oreo Cookies Recipe;
- Contains 2 cups of Oreos.
- The surface is crispy, but the interior is chewy!
- A knockoff of cookies and cream cookies.
- Because the dough is not chilled, it is ready for baking in 10 minutes!
The Directions
- Prep the oven to 350 degrees Fahrenheit.
- Combine the salt, a half cup of chocolate chips, one and a quarter cups of Oreos, baking soda, and flour in a medium mixing bowl. If you don’t want to press chocolate chips or Oreos on the exterior of each dough ball before baking, add them all at once now. Then, place aside.
- In a mixing bowl (large), cream together the butter, granulated sugar, and brown sugar with an electric mixer for 1 minute.
- Beat in the eggs and vanilla extract until well combined.
- Add the flour mixture gradually, mixing with a spatula or on low speed just until incorporated.
- Line a baking paper or sheet with parchment paper or a silicone baking mat and form dough balls using a cookie scoop. On the outsides of the dough balls, press the remaining chocolate chips and Oreos.
- Arrange 6-8 cookies on a pan or tray, spacing them approximately 3 inches apart.
- Bake for 10-12mins, till the sides are golden brown and the middle puffs up. It is recommended to slightly underbake these cookies so they are chewy and soft when they cool!
- Allow 15 minutes for the cookies to cool prior to lifting them out of the baking pan and keep the cookies in an airtight container if you want to store them.
How About Making Your Own Oreos Instead of Buying Them?
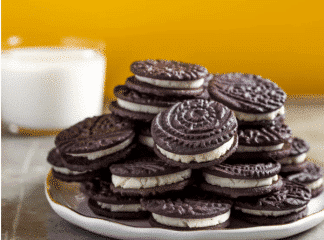 It can be a fine way to spend an afternoon—not that homemade Oreos will take that long! They need less than an hour from start to finish, with very little in the way of special ingredients or equipment. And you can make them dark and intense as the original, with a hint of bitterness to balance the sweet vanilla filling.
In the end, it’s a pretty simple chocolate shortbread combined with a clarified butter filling (more on that in a bit); whether you dress it up with an embossed rolling pin is strictly a matter of personal taste.
The Recipe for Making Your Own Oreos
- Prep Time: 50 mins
- Cook Time: 25 mins
- Active Time: 60 mins
- Cooling Time: 30 mins
- Total Time: 105 mins
- Serving Size: 45 sandwich cookies
Equipments & Kitchen Utensils Used: Medium-sized mixing bowls, stand mixer fitted with a paddle attachment, timer, spoon, heavy-duty pastry bag fitted with a half-inch tip, offset and heat resistant spatula or flexible spatula, rolling pin, embossing rolling pin (optional), 1 1/2-inch round cookie cutter, half sheet pans, fine-mesh strainer, measuring cup, kitchen knife, refrigerator, 2-quart stainless steel saucier, plastic wrapper, oven, parchment-lined aluminum baking sheet, and an airtight container
Ingredients
For the Chocolate Wafers:
- 4 ounces of unsalted butter (about 8 tablespoons; 115g), creamy and soft, about 68°F (20°C)
- 3 1/2 ounces of sugar (about 1/2 cup; 100g)
- 2 ounces of golden syrup (about 3 tablespoons; 55g), such as Lyle’s
- Half a teaspoon of baking soda
- Quarter teaspoon (1g) of Diamond Crystal kosher salt; for table salt, use about half as much by volume or the same weight
- 1 1/4 ounces of Dutch-process cocoa powder (about a cup plus 1 tablespoon; 35g), such as Cacao Barry Extra Brute, plus more for dusting[mfn]https://www.seriouseats.com/bravetart-homemade-oreo-style-cookies-recipe[/mfn]
- A quarter teaspoon of coconut extract (optional)
- 5 3/4 ounces of bleached all-purpose flour (about 1 cup, spooned; 165g), such as Gold Medal
For the Filling:
- 6 ounces of unsalted butter (about 12 tablespoons; 170g)
- 1 teaspoon of vanilla extract
- 8 teaspoons of Diamond Crystal kosher salt
- 8 1/2 ounces of powdered sugar (about 2 cups plus 1 tablespoon; 240g)
Directions
- For the Chocolate Wafer Dough: Combine butter, sugar, golden syrup, baking soda, salt, and coconut extract (if using) in the bowl of a stand mixer fitted with a paddle attachment. Mix on low speed to moisten, then increase to medium and beat until fluffy and light, about 5 minutes, pausing to scrape bowl and beater about halfway through.
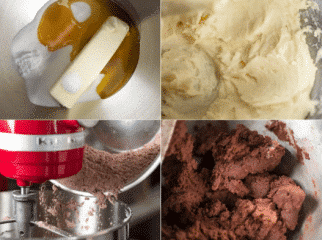
- Sift flour and cocoa together: If using cup measures, spoon into the cups and level with a knife before sifting. With a mixer running on low speed, sprinkle the flour/cocoa mixture into the butter mixture. It will seem dry and mealy at first but continue mixing to form a smooth dough. Knead against the sides of the bowl to form a smooth ball, then divide in half and flatten it into disks. Use immediately or wrap in plastic and refrigerate for up to 1 week; soften cold dough for 30 minutes at room temperature, then knead on a bare surface until pliable and smooth.
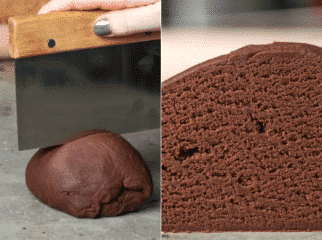
- For the Wafers: Adjust the oven rack to the middle position and preheat to 350°F (180°C). On a cocoa-dusted surface, roll a portion of the dough into a 7-inch square. Sprinkle both sides with cocoa and roll until 1/4 inch thick; generously dust with cocoa and continue rolling to an 1/8-inch (see note). Alternatively, roll the dough to 1/8-inch using an embossed pin. Slide an offset spatula under the dough to loosen it, brush away excess cocoa, and stamp into 1 1/2-inch rounds.
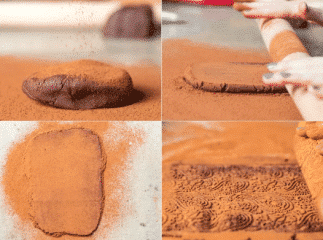
Arrange on a parchment-lined aluminum baking sheet, leaving 1,4-inch between wafers. Gather scraps, knead, re-roll, and cut as before. Repeat with the remaining dough as well. Any remaining scraps can be discarded or baked to grind for crumbs. Bake until the wafers are firm and dry, about 15 minutes, and cool to room temperature on the baking sheet. Fill immediately or store in an airtight container for up to 1 week at room temperature.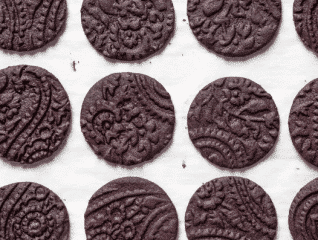
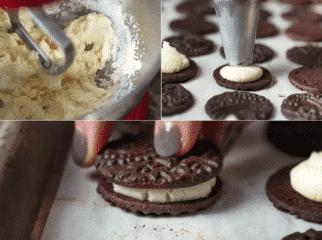
- For the Filling: Before making the filling, flip half the chocolate wafers upside down so they can be filled immediately after preparing the filling, as it will quickly set.
In a 2-quart stainless steel saucier, completely melt butter over medium-low heat. Simmer, stirring with a heat-resistant spatula, while butter hisses and pops; if you notice brown bits forming along the edges, reduce heat to low. Continue cooking and stirring until butter falls silent, then strain into the bowl of a stand mixer fitted with a paddle attachment.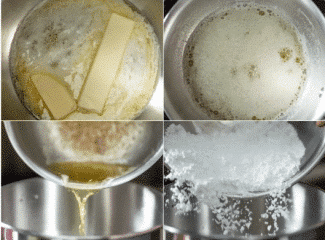
- Add vanilla and salt, followed by powdered sugar. Mix on low to moisten, then increase to medium and beat until creamy and soft, about 5 minutes. Transfer to a heavy-duty pastry bag fitted with a half-inch tip and use immediately; this filling cannot be made in advance.

- To Sandwich the Wafers: Pipe a generous dollop of filling in the center of each upturned wafer (just shy of 1 tablespoon, or a little more than a quarter ounce). Sandwich with remaining halves, transfer to an airtight container and stand at room temperature until filling has set about 30 minutes. The cookies will keep for up to 1 week at room temperature, up to a month in the fridge, or 3 months if frozen; serve at room temperature.
Mixing and Rolling Out the Cookie Dough
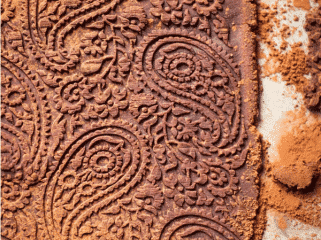 The dough starts out with a combination of butter, sugar, and golden syrup (plus baking soda and salt), creamed up until fluffy and light. The golden syrup adds a subtle caramel note and also provides enough moisture to bind the eggless dough together.
This reduces the overall water content, limiting gluten formation so the cookies turn out crisp rather than tough, despite all the kneading and rolling and re-rolling they’ll endure.
It’s finished with a blend of high-fat Dutch-process cocoa powder and all-purpose flour—as with all the recipes in my cookbook[mfn]https://thefirstyearblog.com/oreo-cookies/#recipe[/mfn], It is recommended to use red/white wheat flour blends, such as bleached Gold Medal flour, for a perfect balance of protein and starch.
Once the dough comes together in the mixer, knead it until smooth, then divide it in half. It should feel stiff and thick, but not crumbly (this can happen when using the wrong types of flour, or if the ingredients are too cold and/or not creamed long enough).
To keep the dough beautifully dark, it’s dusted and rolled with cocoa powder. Don’t be shy! The dough is more than capable of handling it, and there’s no reason to deal with obnoxious sticking when excess cocoa can simply be brushed away.
Thanks to all that cocoa, it’s easy to roll the dough until it’s ultra-thin—just an eighth of an inch thick. That’s an important measurement, because not only will the wafers puff as they bake, but they’ll also be paired with a “creme” filling.
Keeping the wafers thin ensures the finished sandwich cookie is delicate and crisp. Plus, when the dough is too thick, the yield will be lower as well.
If you’re very experienced with handling cookie dough, a fun trick is to emboss the dough with a decorative pin. For first-timers, I recommend simply rolling the dough flat.
It takes practice to comfortably roll the dough to an eighth of an inch, and embossed pins can be a little tricky to master, so it’s not worth the frustration if you’re new to rolling out dough. But for those who’ve been around the block a time or two before, it’s a beautiful touch for homemade Oreos.
Cutting and Baking
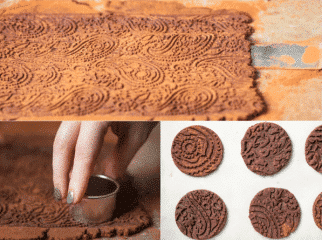 Whether the dough is plain or embossed, loosen it from the counter with an offset spatula, then cut the cookies into one-and-a-half-inch rounds. They’ll spread a touch in the oven but can be arranged fairly close together on a parchment-lined half-sheet pan.
Don’t worry if the wafers look reddish-brown at this stage; they’ll darken to an inky black as they bake, thanks to the alkalinity of the dough. For that reason, normal visual cues, like “bake until golden brown,” fly out the window, so it’s better to trust your other senses.
Bake the chocolate wafers until they’re fragrant and firm to the touch, about 15 minutes at 350°F or 180°C (though the exact timing will vary depending on the specific thickness of the dough).
A Thick and Creamy Filling
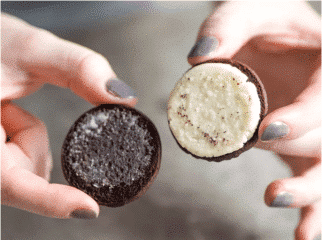 When the wafers have cooled, flip half of them over, then get started on the filling—when it’s ready to go, you’ll need to work fast. For most DIY Oreos, that filling is a simple mix of butter and powdered sugar, a style that’s inevitably soft and squishy at room temperature.
But that’s just a reflection of how those ingredients interact, with the water content in butter working to melt a portion of the powdered sugar. That dilemma can be overcome by increasing the sheer volume of powdered sugar, but this also makes the filling hyper-sweet and too stiff to pipe.
Instead, an easy workaround is to melt the butter, then simmer to drive off all the water—sort of like a rough clarified butter, or a cheater’s ghee. That way, it won’t negatively affect the powdered sugar, which can actually taste pretty good if you buy the right kind.
The hot butter reduces the grit of the powdered sugar without melting it, and they whip together into a thick and creamy paste. While it’s still mixing, fit a large pastry bag with a half-inch round tip. The filling is gonna be thick, and that whole “snip a corner off a zip-top bag” thing won’t do.
Pipe a quarter-ounce blob of warm filling onto the bottoms of half the chocolate wafers (no need to be precise), then sandwich it with the remaining wafers. You don’t need to work at breakneck speed, but it’s important to finish up sooner rather than later, as the filling will stiffen as it cools.
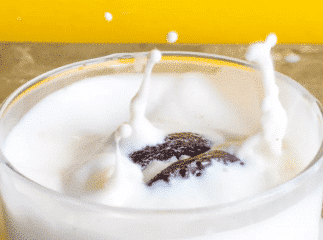
Not a little, but a lot—as thick and stiff as the filling in a real Oreo, so it behaves the same way, down to that little stutter of resistance as the wafers twist apart. It also means the filling will stay put even at room temperature, so you don’t have to worry about it squishing out the sides, even after a good old-fashioned dunk. So preheat the oven, roll up your sleeves, and grab a gallon of milk. It’s time to bake!
Recipe Notes
Dough size and baking time
- If you are using big dough balls, make sure to bake for 14-16 minutes, or until the edges of the cookies start to turn brown.
- Reduce the baking time if you produce smaller dough balls or else, the Oreo cookies will be overbaked.
How to measure flour correctly
- Using a fork, fluff the flour.
- Scoop or spoon the flour into the measuring cup with a spoon.
- Level the flour inside the measuring cup with a butter knife.
- Putting the measuring cup directly into the flour bag is going to cause too much flour to be packed into the cup, resulting in dry cookies. When making cookies, be sure you measure the flour accurately.
Chef advice
- Make consistent balls using a cookie scoop.
- Before baking, press more Oreo bits on the exterior of the dough balls for a loaded cookie appearance like the photographs!
- Use the spoon and sweep technique to measure out the all-purpose flour.
- To make creaming the butter and sugar simpler, use room temp butter.
If you are making your own Oreos, then the yield of this recipe depends on rolling the dough to 18 inch; slightly thicker wafers will taste just fine but will make fewer, less delicate cookies.
After Baking, Are Your Oreo Cookies Spreading Instead of Being Firm? Learn Why and How to Prevent Your Cookies from Spreading
- Greasing cookie sheets: Instead of using greased cookie sheets, you can use parchment paper or silicone baking mats. Cookies spread more easily on greased cookie pans.
- Warm cookie sheets: This may occur if you continue to bake on a single cookie sheet without leaving it to cool after each batch. If baking all of the cookies on the same cookie sheet, let them chill for 2mins after each batch. It is recommended to use two cookie sheets so that one may cool with the Oreo cookies on it while the second baking sheet is in the oven.
- Not enough flour inside the batter: If the cookie dough lacks structure or flour, the fat will melt quickly, causing the biscuits to spread.
- The temperature of the oven: Your oven may be too hot, too cold, or have hot spots.
- Unrefrigerated dough and melted butter: Because this recipe does not call for freezing the cookie dough before baking, it is critical to use soft butter rather than molten butter.
- Not enough flour inside the batter: If the cookie dough lacks structure or flour, the fat will melt quickly, causing the biscuits to spread.
- Too much butter or too much sugar: Too much of these, along with insufficient flour, disrupt the structure of the cookie. It’s all about striking the right balance.
How to Store Oreo Cookies
 Store these cookies on the counter in an airtight jar for up to 5 days. Place a slice of bread in the jar to keep the cookies soft for many days. The cookies will absorb the moisture that comes from bread.
Oreo Cookies – A Dessert Delicacy Made in Heaven
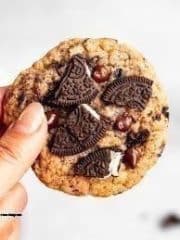 These Oreo cookies are loaded with 2 cups of chopped Oreos! Some of the best cookies and cream cookies we’ve tried! Crispy on the outside and chewy on the inside, this is an awesome Oreo cookie recipe!
For many, the allure of a from-scratch Oreo (or any copycat recipe, really) comes down to the satisfaction of making something by hand. If you like baking; If you like playing with real butter and sugar. If you like how the dough feels in my hands, and the way your kitchen smells when there’s a tray full of cookies in the oven, then these Oreo cookies are for you. You will love the way these cookies taste so comfortingly familiar after a good soak in a glass of milk.
[bwla_faq faq_topics=”frequently-asked-questions-about-oreo-cookies” sbox=”1″ paginate=”1″ pag_limit=”5″ list=”1″ /]
Oreo Brownies Recipe | A Match Made in Dessert Heaven (with Top Chef Tips and Insights)

Get ready to embark on a delectable journey into the world of Oreo Brownies. These irresistible treats are a true testament to the marriage of two iconic desserts: the classic chocolate brownie and the beloved Oreo cookie.Indulge your senses as we unravel the magic behind these mouthwatering delights. Oreo Brownies brings together the best of both worlds – the fudgy richness of a chocolate brownie and the delightful crunch of Oreo cookies.This divine fusion elevates the traditional brownie to new heights, creating a treat that is simply irresistible. With each bite, you'll experience a harmonious blend of velvety chocolate and the unmistakable Oreo essence, leaving you craving more.
Type: Dessert
Cuisine: American
Keywords: Oreo Brownies
Recipe Yield: 45 sandwich cookies
Calories: 283kcal
Preparation Time: 50M
Cooking Time:
25M
Cooling Time: 30M
Active time: 60M
Total Time: 1H45M
Recipe Ingredients:
- 1 cup of semi-sweet chocolate chips, divided
- 2 ¾ cups of all purpose flour
- ¾ cup of granulated sugar
- 1 teaspoon of vanilla extract
- ¾ cup of packed brown sugar
- 2 large eggs
- 1 cup of unsalted butter, room temperature, 2 sticks
- 1 teaspoon of baking soda
- ½ teaspoon of salt
- 2 cups of chopped oreos, divided (about 15 cookies), Not oreo crumbs but crushed oreo pieces. Place the oreos in a ziploc bag and use a rolling pin to crush them – then measure out 2 cups.
Recipe Instructions:
Step 2:
Step 3 :
Step 5:
Step 6:
Step 8:
Step 9:
85


